Tuesday, December 19, 2017

Susan shared some scarves she did recently.....

When Susan called to register for Melissa's Shibori Dye class the other day, she mentioned some other dye classes that she took recently in Florida and forwarded some photos for show and tell.

Both are eco-printing, as you can see. One, obviously, in an indigo dye bath!   They are lovely, Susan. Thanks for sharing.

So for those of you who are registered for the Shibori class with Melissa, remember that the dyepot will not be exhausted and we have a couple of days to play after the class is over , so we'll have to do some eco-printing along with whatever shibori we want to practice (or to make more of) !

I'll make a note to pick up some eucalyptus at Trader Joes  the week Melissa comes -  and then we can spend a few days after class dyeing away!!!

So here are Susan's two scarves....and beyond them, my latest collage which I added here since it also used some shibori/indigo dyed fabric that I did this fall!

It all gets me so revved up for Melissa's workshop here this next summer!


Friday, November 10, 2017

I am really enjoying trying new ways to use the collage pieces that I have been making.  Jen and I were talking about how much they add to a piece, give it that pop!  I decided to try my hand at a simple purse and here are the results:


Monday, October 30, 2017

Back to creating

It has been a whirlwind summer, really fun but with little time to create.  But now that the seasons are changing I have found my way back to the studio and am having a ball!  Here is a collage piece that I finished.  It is a small collar but with a lot of pop from the collage element!  Thanks to Jen who gave me all the pieces of fabric to finish the collage!


Monday, October 23, 2017

A couple of "works in progress"

So I finally got around to cutting up a collage I shared previously and felting it into a couple of "bags-to-be".

I kind of hate sharing the unfinished things, but since it's been a while since I posted and since it will be a while before I get the buttons made and all the leather work done......

My intentions are to finish the bags with some black camel leather I got in Morocco. So the photos are of unfinished bags- they still need to be stretched and blocked and then I'll add all the leather lacings and trim. So you will see from the photos that they are clearly unfinished at this stage!

This first bag has 3 front pockets that angle their way up the bag. I felted it in one flat piece (so front and backs together) and I plan to use a wide piece of leather  to form the bottom and gusset on one side (the fold between the front and back of the felt will become the "other") side of the bag and then I will braid from the same leather an over the shoulder length strap using 4  or 6 strands for a round braid (depending on which scale looks best with the dimensions of the bag).  This bag, once folded and gusseted will measure approx. 8" by 10" with about a 1.5-2" gusset. It looks rather awkward at this stage because the gusset is not built in yet and the button keeping the flap down is not yet done.

I also think I will end up doing some sort of stitching along the angled front pocket edges to make them more pronounced. The pieces of silk fabric I placed on each angle intending them to delineate the edge, got too muted so I feel like they need some sort of emphasis.

I added a very thin layer of black karakul lamb between 3 thick merino layers on each side thinking that the inner strength of the karakul would add structure but the 3 layers of merino on either side would keep the karakul "invisible". But the karakul worked its way to the surface, so the colors of the collage are not so vibrant as I planned on. I did get the structure I wanted, but the muting of the collage was an unanticipated consequence of that fiber layout decision.


upper pocket
 
 with flap down
 
And here is the second, work in progress. I used the same piece of collaged felt, but kept this bag simpler and larger. It will be a shoulder bag (not cross chest) and after blocking it I will work a leather edging and handles. On this bag, I worked the gusset into the felt so will not use leather for that purpose - just for braiding and trimming. I used just black merino as the base for this bag.
The back (or front - since I haven't decided which is which, yet) is similar but different and I forgot to snap photos of this. This bag is approx. 15" x 12" and has a 2" gusset.
 here is the original piece of collage I did -


Friday, October 6, 2017

Wendy's first collage....and a new addict created!

I had a "play weekend" here at the shop last week. My sister Wendy came to join us. She's a felter, but has a bad history with sewing machines, so I was a bit nervous about showing her the felt collage technique!
But Jules was here too, so there were two of us who do felt collage and so I figured we could help Wendy thru it. And those of you who know Jules know that she can make anything light and fun!
So Wendy made it thru those initial frustrations of hitting pins, breaking needles, the bobbin jamming and made a beautiful piece of collage. She hasn't cut it up and felted in into anything yet, but she's ruminating about what it will become as we speak.
I also did a piece, but I can't find that photo on this computer, so I'll have to share that another day!
I do have a photo of one of Jule's collages, but will let her post that.
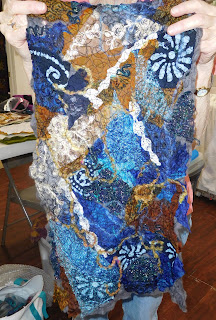
What we thought was particularly effective in Wendy's collage were the pieces of lace that added texture (which you probably can't see from the photo) and the stark motifs from a piece of indigo batik fabric I did (white flowers and swirls).  And I love the combination of the gold/orange with the blue. Wendy put a lot of "glitzy" stuff in it which I didn't realize while it was still wet but she said yesterday on the phone that she is recommending people wear sunglasses when they look at it because she thinks she went a little overboard!
I reminded her that once she cuts the collage up and felts it into a bag or wrap or whatever she is going to do with it, the "glitz" will be toned down. Not sure she believes me.....

Saturday, July 29, 2017

Susan's latest....

Susan sent a photo of this shawl she did in another workshop with Melissa - the White on White technique which I hope to have Melissa here for next year along with teaching Indigo Shibori. 
That attests to how great Melissa was - after her wonderful workshops here in April, Susan has gone on to take 2 more with her!

Anyway, Susan asked me to post it for her. Like Susan's last show & tell, she is doing some lovely work with negative space - it is so effective for a lacy border.

Wish you lived closer, Susan - you'd have fun at our "Play Days"!

Thursday, July 27, 2017

A couple more hats....

Sorry that there is no collaging or shibori to share yet! It's been too rainy to dye and I just HAVE to finish these hats before I can collage the bag I have in mind! You know....too many works in progress to be able to start something else!

But I didn't want anyone to think I had forgotten the blog - so here are a few pics of completed hats (many of which you saw in various states while here last week for Maria's classes!)
I have 3 more hats almost done and I WILL do another collage before I head to Maine for vacation next week!

Crazed, as always, but having fun....Jen


Tuesday, July 18, 2017

A collage Ode to Jen

Jen gave me some wonderful fabrics to try when I was at her shop last week.  I decided I should use them all and make something remarkable!  I love the colors and the textures and can't wait to put them into a finished piece! The first picture is of the layout and then next two after it has been sewn....stay tuned for the finished piece!  Thank you Jen!


Maria Friese Class on Vessels

I had so much fun at Maria Friese's class on vessels last week hosted by Jen Hoag at her wonderful store, Northeast Fiber Arts Center in Williston Vermont.  I learned so much and as always meeting people who love to work with fiber as much as I do is always a hoot!  Thanks Jen for offering such wonderful classes and thank you Maria for your incredible talent!  Love you!


Saturday, July 15, 2017

Jule's vessel....

So Jules and I have been pre-occupied this week with Maria Friese....so just a quick photo of Jules working on her Symmetrical Vessel.
We're both still inspired and will post next week. And I've got a few more recruits from the latest workshop to participate - so hopefully Martine and Victoria will be joining the group for show and tell!
And hopefully I can recruit a few more over the weekend's Poetic Surface Design to start contributing too!

Saturday, July 1, 2017

Jen's hat....

Here is my "finished" piece for the month....

I took one of the first week's samples, cut it up, and felted 3 pieces ( a brim, a crown and a side band) to sew the bucket hat shown below.


At first I loved the hat (actually, it isn't quite done, but I had the camera out to post something on the store's facebook page so I figured this was close enough - I still have to stitch on the brim edging, which will be black). Then I thought it looked like a couch (upholstery fabric and all!). Now, I'm not sure. But it doesn't really even matter - I learned a lot working thru the process! And I enjoyed the process. And it offers me another hat to show the felters taking my 3 day hat making workshop in August, another way to approach felt hats!

So still having fun with this felt collage technique. As soon as this rainy weather passes, I look forward to doing some shibori dyeing on the white piece I felted last week.

And I hope to see some photos from Susan, who is taking another workshop with Melissa next week! Retirement must be nice!

Saturday, June 24, 2017

Nancy's projects


I have been very busy preparing for the League of NH Craftsmen's Fair. I have done a bit of Shibori dyeing, and a lot of felting. I have been working on poncho type garments as shown in the photos.All of the garments pictured were felted using shibori silk, some chiffon, some hauli, and one with the silk seersucker I dyed in class. The dyeing class has really expanded my horizons in terms of what silks I have to work with, and I feel comfortable doing my own dyeing for the first time.

Thursday, June 22, 2017

A couple of finished pieces and one new collage from Jen

Jules is right....you don't want to waste a thing when collaging.

So using the last 6 triangles and 3 rectangles that I had cut from the original green collage I did a couple of weeks ago (made a wrap and pair of wristlets from already), I re-collaged a headband for a new hat that I felted this week.

I've shown the hat here with the re-collaged hat band as well as with the satin ribbon I think I like better!  I love the re-collaged hat band -  but somehow not for this style hat. So I think I'm going to settle on the satin ribbon I pleated and then felt another hat (I have some Finn ready to go) for the re-collaged hat band. If anyone has any opinion , I'm glad of it!

 Since I'm still deciding which hat band to use, this is just pinned in (hence the yellow dots!) for the photo showing the back.

learning: reminded that the shrinkage rate on the re-collages is less than one would ordinarily plan on so this band came out WAY too thick and I cut it in 2 lengthwise and now I have 2 hat bands....or 1 hat band and maybe I'll take a note from Jules and play with some cuff ideas -maybe rough up the backside and felt it to some KAP wool for a good sturdy cuff?

 
My next finished piece is this clutch/bag.  Well, it is almost finished! I'm going to the opening of the VT Quilt Fest tonight and hoping someone there (there usually are some bag vendors) is selling metal straps so I can finish this (I envision this as a cross shoulder bag and don't like the idea of leather or fabric for this bag). This bag was felted from an original collage (i.e. I did not cut it up and re-collage it). I had loved the sample just as it was and it was the perfect size to felt down and have the perfect dimensions for a simple tri-fold clutch. Wish I hadn't used a flash for these pics since the colors are actually much deeper/darker than shown here - front and back of the bag pictured in that order. It's too bad since the colors are really rich - you know, the way I like them - very saturated and the photo doesnt' convey that.

learning - I started off by trying to felt this bag 3-d using resists and it was a nightmare that way so I pulled off my lining at the pre-felt stage and pulled off my gussets and felted it flat and then sewed!


Lastly, I worked up a small white on white (some of it looks yellow, but that is because the silk noil pieces are still wet and when dry they will be more ecru/light tan).  I'm gearing up to do some shibori dyeing and so wanted to make a white on white piece to shibori. I laid this out really thin so that when I re-collage it this weekend and then shibori dye it, it will still have a nice hand for a cowl. I used several silk fabrics: velvet, matelese, noil, dupioni, and satin as well as cotton cheesecloth, some linen blend and topped it off with a bit of wool/alpaca yarn. I used this array because each fabric and fiber will take the dyes differently and so that will add additional dimension to the finished collar.  The pics above are pre and post - doesn't look like much at this stage since it is really just going to serve as a canvas to dye on!

I was reminded:
  • white on white is hard to do when you have a chocolate lab that sheds!
  • using white thread on the white soluble stuff is hard to see where you've stitched - so I needed to go back in after dissolving the soluble in order to stich over a few places that I missed!

Having so much fun - you're keeping me going, Jules!  I am having to alternate between my knitting projects and my collaging. And of course I'm still up to my ears in hats because of the upcoming class I'm teaching and so I need lots of finished hats showing different styles, breeds, trim ideas and techniques to inspire the participants. 

Tuesday, June 20, 2017

MY first projects with my sample collage

I have been slow to post so I thought I should get this one on this morning even though I still need to finish it!  I took my first sample collage which was a small square and used every bit of it to create this small collar.  I used a piece of paj silk on the back that I had eco-dyed many years ago!  I like the way it has turned out so far now to make the button hole and button.


Next I worked with some leather pieces I had and am working on a prototype for a bracelet.  This leather was from an old skirt of mine that I cut up and used!  Next I want to try it with a piece of leather that I boil.  With a bit more work these might be kinda nice!  I also took some small scraps of the collage, you don't want to waste a thing! and started a pair of earrings with leather!  This is some much fun, thanks Jen!